

Shopware 6 CAPTCHA Plugin
The following tutorial will guide you on how to integrate the TrustCaptcha CAPTCHA solution into your Shopware 6 store to protect it from bots and spam.
Preparation
Section titled “Preparation”You should have already completed the following steps before you start to integrate TrustCaptcha into your Shopware 6 website.
Read Get-Started: Get a quick overview of the concepts behind TrustCaptcha and the integration process in get started.
Existing CAPTCHA: If you don’t have a CAPTCHA yet, sign in or create a new user account. Then create a new CAPTCHA.
Existing Shopware 6 website: You need a Shopware 6 website in which you want to integrate TrustCaptcha.
Supported Shopware Forms
Section titled “Supported Shopware Forms”TrustCaptcha registers itself as a native CAPTCHA solution within Shopware 6. Once activated under Active CAPTCHAs, Shopware automatically displays it on the storefront forms it natively integrates a CAPTCHA into. Based on our tests, this typically includes:
- Customer registration
- Contact form
- Checkout (guest order / registration during checkout)
- Newsletter sign-up
- Product reviews
- Forms from third-party extensions that build on Shopware’s native CAPTCHA system
Some third-party extensions offer their own option to enable CAPTCHA support, which may need to be activated first.
Whether and where the CAPTCHA appears is ultimately decided by Shopware, your storefront theme, and the extensions you use. Forms that do not use Shopware’s native CAPTCHA system, such as fully custom forms, need to be integrated manually. See Custom and Third-Party Forms for details.
Follow the steps below to integrate the TrustCaptcha CAPTCHA plugin into your Shopware 6 store.
1. Installation
Section titled “1. Installation”Perform the following steps to install the CAPTCHA plugin.
Install via zip upload
- Download our plugin file here.
- Log in as an administrator. Navigate to
Extensions → My extensionsand click theUpload extensionbutton. Upload our plugin as a complete ZIP archive. - Once the upload is finished, locate
TrustCaptchain the extension list and install and activate the extension.
Install via Shopware Store (coming soon)
The plugin is not currently available in the official Shopware Store. We will publish the plugin there as soon as possible.
2. Configuration
Section titled “2. Configuration”Follow these steps to configure TrustCaptcha in your Shopware 6 store:
- (Login as an admin to your Shopware 6 administration.)
- Navigate to
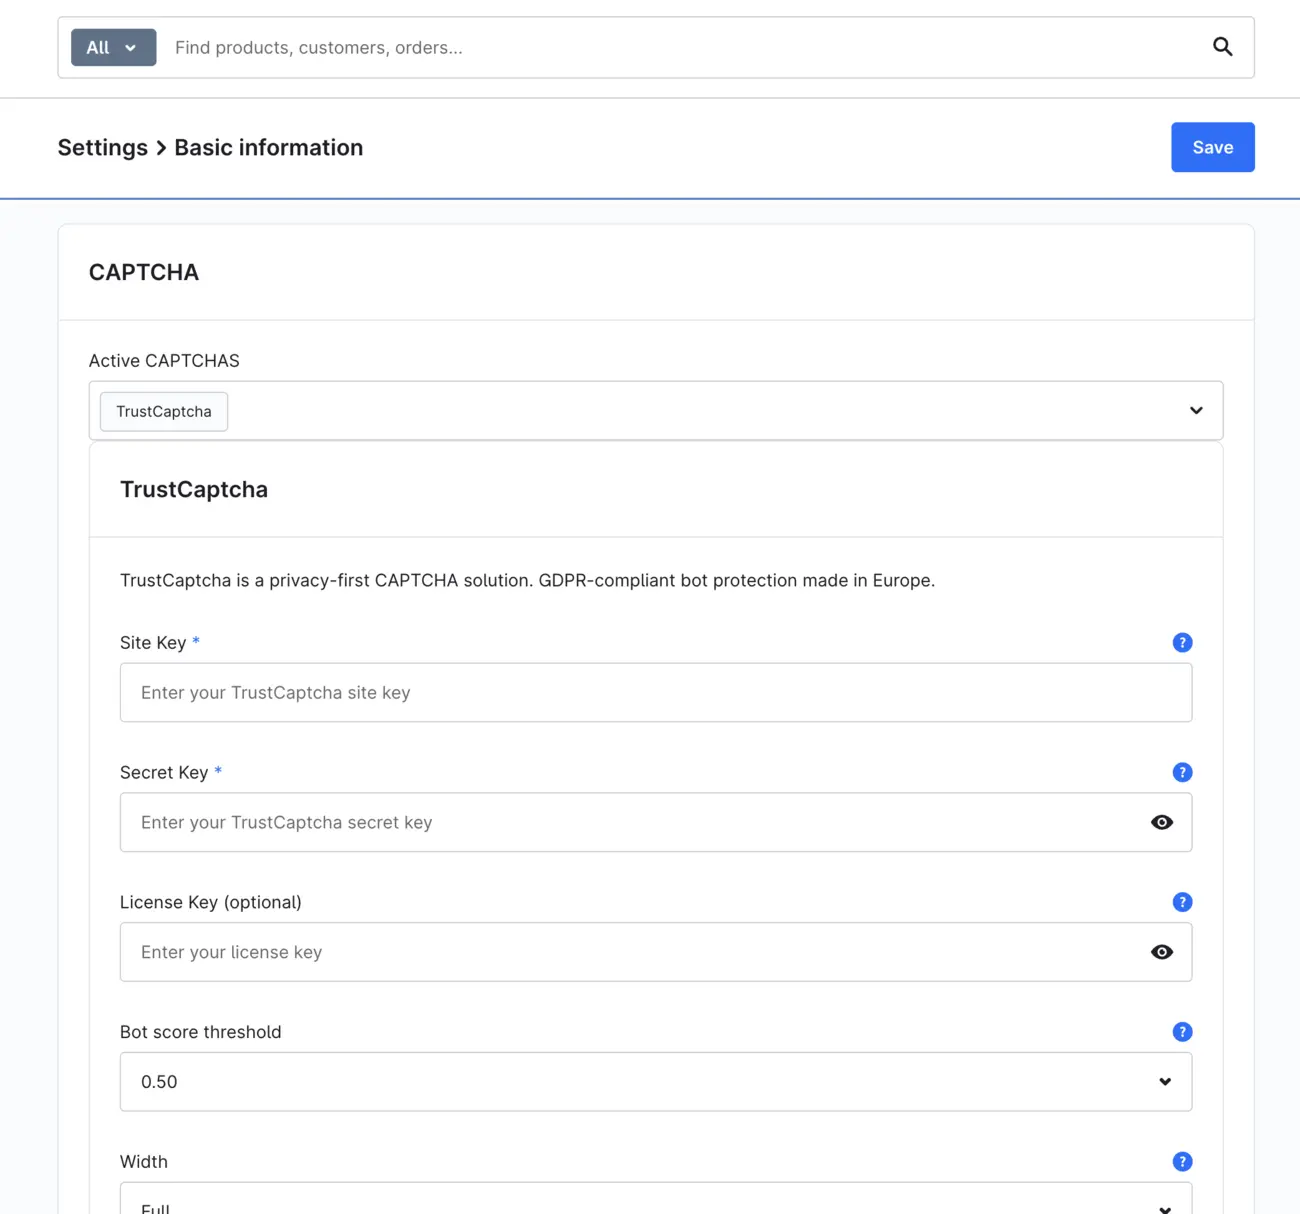
Settings → Basic information(in older Shopware versions:Settings → Shop → Basic information) and scroll down to theCAPTCHAsection. - Open the
Active CAPTCHAsdropdown. We recommend removing all other entries and selecting onlyTrustCaptchato avoid conflicts with other CAPTCHA solutions. - In the TrustCaptcha settings that appear below, enter the
site-keyand theapi-key(formerlysecret-key) of your CAPTCHA. You can find and manage these keys in your CAPTCHA settings. - Optional: Adjust additional settings such as language, theme, or threshold as needed.
- Click
Saveto apply your changes.
3. Ready to Use
Section titled “3. Ready to Use”The TrustCaptcha plugin for Shopware 6 is now successfully installed and configured. TrustCaptcha will automatically appear on the storefront forms covered by Shopware’s built-in CAPTCHA integration.
Custom and Third-Party Forms
Section titled “Custom and Third-Party Forms”As described above, forms that use Shopware’s native CAPTCHA system are covered automatically. Forms that do not, such as fully custom forms, can be integrated manually. This requires two steps: rendering the widget inside the form, and validating the result when the form is submitted. Both steps are required, as rendering the widget alone does not protect the form.
1. Render the Widget in the Form
Section titled “1. Render the Widget in the Form”Inside your <form> element, include Shopware’s native CAPTCHA partial:
<form action="..." method="post">    {# your existing fields #}
    {% sw_include '@Storefront/storefront/component/captcha/base.html.twig' %}
    <button type="submit">Submit</button></form>
This renders all active CAPTCHAs, including TrustCaptcha, and loads the required widget script automatically. No additional JavaScript include is necessary.
2. Validate the Submission on the Server
Section titled “2. Validate the Submission on the Server”Shopware only verifies a CAPTCHA on routes that are explicitly marked as CAPTCHA-protected. There are two ways to do this.
Option A: Mark the route as CAPTCHA-protected (recommended)
If you control the controller that handles the form submission, add the _captcha flag to its route. Shopware then validates all active CAPTCHAs, including TrustCaptcha, automatically, using the same validation and storefront error messages as the native forms:
#[Route( path: '/example/submit', name: 'frontend.example.submit', defaults: ['_captcha' => true], methods: ['POST'],)]No further code is required.
Option B: Validate the token manually
If you cannot modify the route, read the verification token from the request and validate it directly with one of our server-side libraries. The token is submitted in the tc-verification-token field:
$verificationToken = $request->request->get('tc-verification-token');
// Validate the token with the TrustCaptcha library or REST API,// then decide whether to accept or reject the submission.
Next steps
Section titled “Next steps”Once you have successfully installed and configured TrustCaptcha on your website, you can use TrustCaptcha to its full extent. However, we still recommend the following additional technical and organizational measures:
Security rules: You can find many security settings for your CAPTCHA in the CAPTCHA settings. These include, for example, authorized websites, CAPTCHA bypass for specific IP addresses, bypass keys, IP based blocking, geoblocking, individual difficulty and duration of the CAPTCHA, and much more. Learn more about the security rules.
Data protection: Include a passage in your privacy policy that refers to the use of TrustCaptcha. We also recommend that you enter into a data processing agreement with us to stay GDPR-compliant. Learn more about data protection.
Accessibility: Customize TrustCaptcha to your website so that your website is as accessible as possible and offers the best possible user experience. More about accessibility.
Testing: If you use automated testing, make sure that the CAPTCHA does not block it. Learn more about testing.

